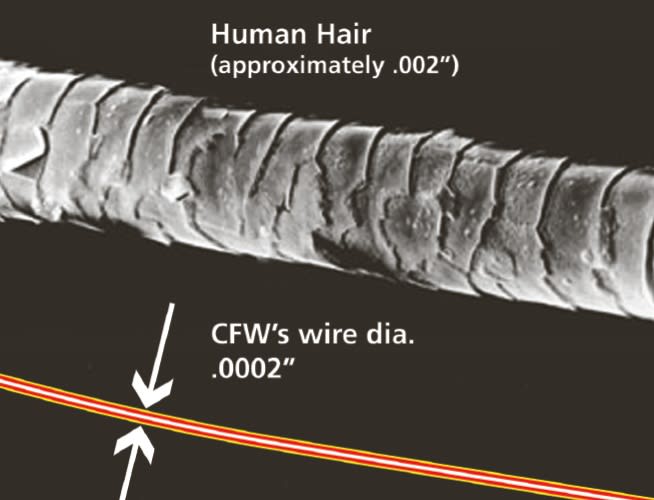
Ultra-fine shaped wire, frequently one-tenth the thickness of a typical human hair, is the basis of critical components in many medical instruments. Minute defects in such wire can lead to life-threatening complications in microsurgery. With life literally hanging by a thread, this micro-thin wire must meet exact tolerances and specifications.
California Fine Wire (CFW) of Grover Beach, CA, has been producing fine wire since 1961 for more than 7,000 customers worldwide. The lion’s share of the company’s manufacturing is done for medical device OEMs who require micro-thin wire drawn to fine diameters and shapes from hundreds of metals and alloys including stainless steel, aluminum, copper, nickel, nitinol, and other precious metals. Wire manufacturing operations include drawing, plating, straightening, cutting, annealing, enameling, re-spooling, shaping cables, stranding, brazing, and soldering alloys, clad, and composite wire. Coatings include Teflon, Formvar, ISO medical polyurethane, polyamide, and various plating coatings like nickel, gold, and tin. CFW supplies fine shaped wire in quantities as small as 50 feet and as large as 300,000 feet, but the average order falls between 1,000 and 2,000 feet.
The wire is used in applications such as cochlear hearing implants, heart probes, and telemetry devices. Medical OEMs use fine wire to make microsurgical catheters and the tools attached to them. They use ribbon-shaped wire to make the outer shape of the catheter, winding the ribbon on an edge to make it extremely flexible, so it’s easier to maneuver inside the human body’s cardiovascular system.
Generally speaking, shaped fine wire does not have a round cross-section — the “normal” form in which it is drawn. Shaped fine wire may be square or rectangular with rounded corners, hexagonal, or a variety of other geometric possibilities, including ribbon. The shape specified can relate to a broad range of requirements, such as current-carrying capacity, flexibility, corrosion resistance, and temperature-related characteristics. Most of these properties also relate to metals and other materials from which the wire is made.
Quality Control

While the ultra-fine shaped wire may be one-tenth the thickness of a human hair, the dimensional tolerances of its features are measured in millionths of an inch, at the threshold of the nanometer world. Internal standards include tolerances that are within 0.000025", so there are not very many instruments that can make such a measurement.
Quality control is a high priority for CFW both in the inspection of raw materials and the final wire product. The company’s quality management system is certified to the ISO 9001-2000 standard. For example, Jorge Jacobs, Quality Assurance Technician at CFW, described a job that begins with a bare wire measuring .0003". It must be coated with an enamel layer that will result in a coated wire with a diameter that does not exceed .0007". That’s just a single coating, but sometimes there are as many as three coatings on the wire with three individual coated diameter limitations. In addition, the wire may have to meet NEMA requirements.
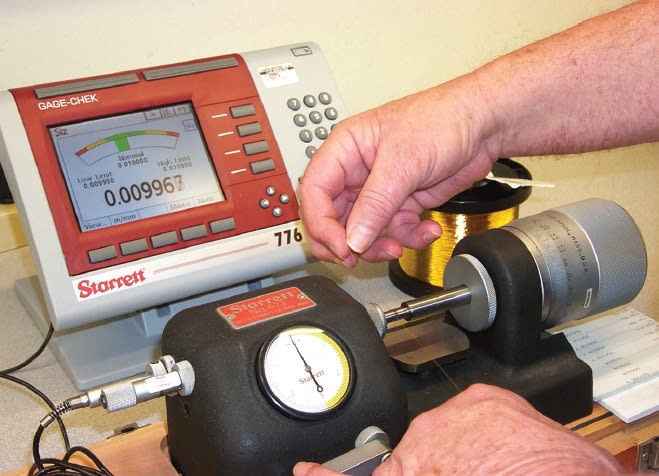
CFW uses bench micrometers from The L.S. Starrett Co. of Athol, MA, to check ultra-finished (polished) wire measuring 2/10,000" in diameter with a tolerance of 25-millionths of an inch. Inspections occur at critical stages of processing; for example, checking incoming wire, at the shaping and coating stages, after manufacturing, and final quality checks.
Inspectors at CFW were accustomed to routine inspections to confirm the wire is within tolerance. However, CFW’s previous amplifiers were giving conflicting readouts. This necessitated a sometimes lengthy process of elimination to discover the reason for the variations. Finally, quality inspectors pinpointed the problem: some of the gage amplifiers were producing different readouts due to the resolution limitations of the amplifiers. The last digit was rounding up, so they required a six-digit readout.
While the 11 bench micrometers on the CFW shop floor are fully capable of accurately measuring the fine wire, the old gage amplifiers could not consistently resolve at the tightest tolerances. CFW started a search for the necessary resolution. They tried laser micrometers but found the fine, airborne dust from the environment interfered with the laser beams. Besides, the problem wasn’t the bench micrometers, but rather, getting the resolution needed out of the amplifiers. The Starrett Gage-Chek 776™ Amplifier allowed a resolution of .000001" when measuring to five-millionths accuracy.
Starrett and Metronics provided an application program formula for the Gage-Chek that counted revolutions of the bench micrometer to achieve the six-digit resolution. Starrett 776 Series LVDT (linear variable differential transducers) probes are attached to the bench micrometers. The micrometer contacts the wire and measures the variance from acceptable wire. Users orient the wire in the micrometer, contact the work, and view the value on the Gage-Chek. If required, users can press a print button to record the inspection. The Gage-Chek has a three-color, microprocessor-based display, allowing even the most inexperienced inspector to visually make quick decisions on part quality.
Thin Wire Flowing

More Information
For more information on the Starrett micrometers and amplifiers, visit http://info.hotims.com/22926-177 .


